Could someone PLEASE help me! Is there any way to get good customer support either online or on the phone anymore? and
both had people on the other end who have really bad head-sets or phone
systems. I swear the voices were worse than a tin-can-string phone from
childhood!
Furthermore, online I find NO WAY to initiate service and request a
static IP.
I'm thinking of leaving AT&T because they are
VERY VERY slow to correct billing changes and my monthly cost has gone
up to $122/month for 20 Mbps down/1.8 Mbps up speeds. $15 of which is for static
IP.
Comcast technical support says over the phone that they can do the static IP for free.
They offer 50 down/ 15 up for 12 months at $53
(includes 3.95 in-home cable maintenance) at my address but I only have
the word of the tech person that static IP is available and free.
I
wish I could find ANY provider not Hughs, not frontier, not AT&T and
not Comcast!
If I want to
start an ISP, I have to pay one of them for the connection to a major
hub in Atlanta (I believe) and what incentive do they have to give me a
fair deal since I would be a competitor?
I love OmNetworks back in Davis, California. I wish I could do something like that here in Atlanta.
Friday, July 25, 2014
Thursday, July 24, 2014
Using Thunderbolt Seagate "tray" for any drive.
I just got the new drive!
I used the Cable Matters 2.5" SATA Hard Drive case to enclose my HGST Travelstar. It did not work "out of the box" because the opening of the Cable Matters box was slightly too small. I whittled away at the bottom, then at the top. In hindsight I think whittling all the change at the top would have been better. I used a box cutter. Do that at your own risk. I have cut myself badly in the past trying to whittle plastic, so don't use the drive cover if you don't want to. It just supports the drive better than sliding the bare drive onto the connector and letting it dangle.
After the adjustments I slid the drive into the the Seagate Thuderbolt "tray" adapter and hooked it up to the Thunderbolt on my MacBook.
I formatted the drive as indicated by Apple, and am proceeding to copy from the old Time Machine Backup from my WD My Passport drive to the new drive following these instructions also at Apple.
I'm not sure what I will do with the My Passport... keep it as a spare "archive" of Time Machine? The "genius" at the Apple Store said I can use many drives for Time Machine. I'll have to look into what he meant by that, other than "use the new drive for new Time Machine backups and forget about the old ones unless you need them" but I can't trust a dieing drive, so I've chosen to copy the files (more than a million so far) from the old drive to the new drive.
This will take a while... more later...
Later: hahahahahahaha! No wonder he gave me that advice!

I am underwhelmed.
Update: I calculated the estimate based on the 35 MB/s USB 2.0 bottleneck of the process and came up with 7 hours. When I went to bed, the dialog said 3 days. Got up the next morning it was done. Relieved to know I was right in my instinct, no way 881GB took 3 days...
Update 2: I did NOT know that you could tell Time Machine to use more than one drive and it decides which backup goes where... Also been reading about it's limitations.
I used the Cable Matters 2.5" SATA Hard Drive case to enclose my HGST Travelstar. It did not work "out of the box" because the opening of the Cable Matters box was slightly too small. I whittled away at the bottom, then at the top. In hindsight I think whittling all the change at the top would have been better. I used a box cutter. Do that at your own risk. I have cut myself badly in the past trying to whittle plastic, so don't use the drive cover if you don't want to. It just supports the drive better than sliding the bare drive onto the connector and letting it dangle.
After the adjustments I slid the drive into the the Seagate Thuderbolt "tray" adapter and hooked it up to the Thunderbolt on my MacBook.
I formatted the drive as indicated by Apple, and am proceeding to copy from the old Time Machine Backup from my WD My Passport drive to the new drive following these instructions also at Apple.
I'm not sure what I will do with the My Passport... keep it as a spare "archive" of Time Machine? The "genius" at the Apple Store said I can use many drives for Time Machine. I'll have to look into what he meant by that, other than "use the new drive for new Time Machine backups and forget about the old ones unless you need them" but I can't trust a dieing drive, so I've chosen to copy the files (more than a million so far) from the old drive to the new drive.
This will take a while... more later...
Later: hahahahahahaha! No wonder he gave me that advice!
I am underwhelmed.
Update: I calculated the estimate based on the 35 MB/s USB 2.0 bottleneck of the process and came up with 7 hours. When I went to bed, the dialog said 3 days. Got up the next morning it was done. Relieved to know I was right in my instinct, no way 881GB took 3 days...
Update 2: I did NOT know that you could tell Time Machine to use more than one drive and it decides which backup goes where... Also been reading about it's limitations.
Getting old(er) Apple Powerbook to use USB 3.0 devices
I haven't tried this but think it would work fine to connect any USB 3.0 device on the market to my Macbook Pro 13" early 2011 model...
SuperSpeed USB 3.0 and Echo Express Card Thunderbolt
Contemplating it. In the meantime I continue to use this; bare drive and cases arrive today, I'll get to try it soon!
Amazon link to Portable Thunderbolt Adapter from Seagate
SuperSpeed USB 3.0 and Echo Express Card Thunderbolt
Contemplating it. In the meantime I continue to use this; bare drive and cases arrive today, I'll get to try it soon!
Amazon link to Portable Thunderbolt Adapter from Seagate
Wednesday, July 23, 2014
Opening duo pro drive, by SimpleTech (Fabrik)
Putting on my tech hat...
I have had this drive for a while. I can't recall when I got it. I found a review here: http://www.videomaker.com/article/13669-simpletech-duo-pro-drive-2tb-storage-device-by-fabrik-review that seems to be talking about a similar drive in 2008. My drive model is 0S00039. By looking at a zoom of the Hitachi drive inside, I see that drive was manufactured in April 2010. I thought it was older than that :-/.
In any case, like the guy in that review, mine had a screw loose inside. I do not recall if it arrived that way, but part of the motivation for cracking it was to find that screw and put it where it belonged.
Also, like that guy, I have to say it is one noisy drive. Thankfully, since it is primarily for archiving important data, it is not on all the time.
To open the drive first pull off the sign that says Warranty void if label removed. YOU HAVE BEEN WARNED! These instructions will void your warranty (if it is still applicable, of course).
Remove the screw under the label.
After prying around the edges a while, I found there were two other screws hidden under the rubber feet that are on the same side as the screw that was removed. By then I had bent two plastic angled brackets that hold the lid on (more on that later).
This image shows the drive after the warranty voided and the screw is out.
This image shows the place the other screws were taken out. Both were taken after the bottom (in image) cover was taken off. (There is a corresponding silver piece on the opposite side.)
Note that in the foreground, there is one foot where I had tried to remove a screw without removing the foot and there was no screw under that foot.
I will now try to describe how to remove the cover without bending (and nearly breaking) two ledge-like plastic forms that help hold the cover on properly (I made that mistake). DO NOT pry from the long edge that ends at that top screw. First, lift the opposite edge (bottom right in Image 2) away from the main dark-grey body, then slide the cover towards the front of the drive (away from the side you see in Image 2).
Here are a couple images of the cover after it was removed.
To the left of both images you see some ledges shown more clearly here (after I tried to bend them back into position).
Then, I removed the screws holding the drive assembly in place. The two drives and interface card form one unit.
At this point, I did not try to fully remove the hardware completely. Earlier I shook out the screw that had been shaking around in there for a while, and then I unscrewed the 4 screws that held in the drive assembly.
DO NOT pry the drive assembly out straight. Lift the part facing the front of the enclosure by tilting it. Then the ports out the back slide out of the holes in the case easily. There is a cable connected to one side of the case. I did not remove the cable because I did not need to get any farther into the case.
Here is the drive bracket without the screw in it. I found the screw floating around inside as expected.
There isn't much more to show. I put in that screw, then gently repositioned and slid the back connectors into the stenciled holes on the back of the enclosure. This was a bit tricky. The back should slide in, and all the ports line up nicely, then the front will fall into place with the LEDs lined up properly for the lights on the front bezel.
After trying not to mess with computer hardware for something like 10 years, it was fun to get in there. Next project should be easier since the equipment I want to mess with is more recent and there are lots of web sites to help the process.
I wrote this up only because I could not find it, and thought that if anyone else wants to do this, they can save themselves from bending the plastic facing the rear of the drive by reading this carefully. I hope it has been clear.
For fun, here is a video of the assembly (taken with my phone). Sometimes I'm busy screwing screws in and the video does not show anything interesting. You can also hear my Shihtzu - Dachshund mix barking at something in the background. More for entertainment.
Youtube link to video
I have had this drive for a while. I can't recall when I got it. I found a review here: http://www.videomaker.com/article/13669-simpletech-duo-pro-drive-2tb-storage-device-by-fabrik-review that seems to be talking about a similar drive in 2008. My drive model is 0S00039. By looking at a zoom of the Hitachi drive inside, I see that drive was manufactured in April 2010. I thought it was older than that :-/.
 |
| Image 1 |
In any case, like the guy in that review, mine had a screw loose inside. I do not recall if it arrived that way, but part of the motivation for cracking it was to find that screw and put it where it belonged.
Also, like that guy, I have to say it is one noisy drive. Thankfully, since it is primarily for archiving important data, it is not on all the time.
To open the drive first pull off the sign that says Warranty void if label removed. YOU HAVE BEEN WARNED! These instructions will void your warranty (if it is still applicable, of course).
Remove the screw under the label.
After prying around the edges a while, I found there were two other screws hidden under the rubber feet that are on the same side as the screw that was removed. By then I had bent two plastic angled brackets that hold the lid on (more on that later).
This image shows the drive after the warranty voided and the screw is out.
 |
| Image 2 |
This image shows the place the other screws were taken out. Both were taken after the bottom (in image) cover was taken off. (There is a corresponding silver piece on the opposite side.)
 |
| Image 3 |
Note that in the foreground, there is one foot where I had tried to remove a screw without removing the foot and there was no screw under that foot.
I will now try to describe how to remove the cover without bending (and nearly breaking) two ledge-like plastic forms that help hold the cover on properly (I made that mistake). DO NOT pry from the long edge that ends at that top screw. First, lift the opposite edge (bottom right in Image 2) away from the main dark-grey body, then slide the cover towards the front of the drive (away from the side you see in Image 2).
Here are a couple images of the cover after it was removed.
 |
| Image 4: Note the "hook" like arms that you need to disengage by sliding the cover towards the front of the drive enclosure. |
 |
| Image 5: In the foreground you see the two legs that were screwed in by the feet cover screws. |
 |
| Image 6 |
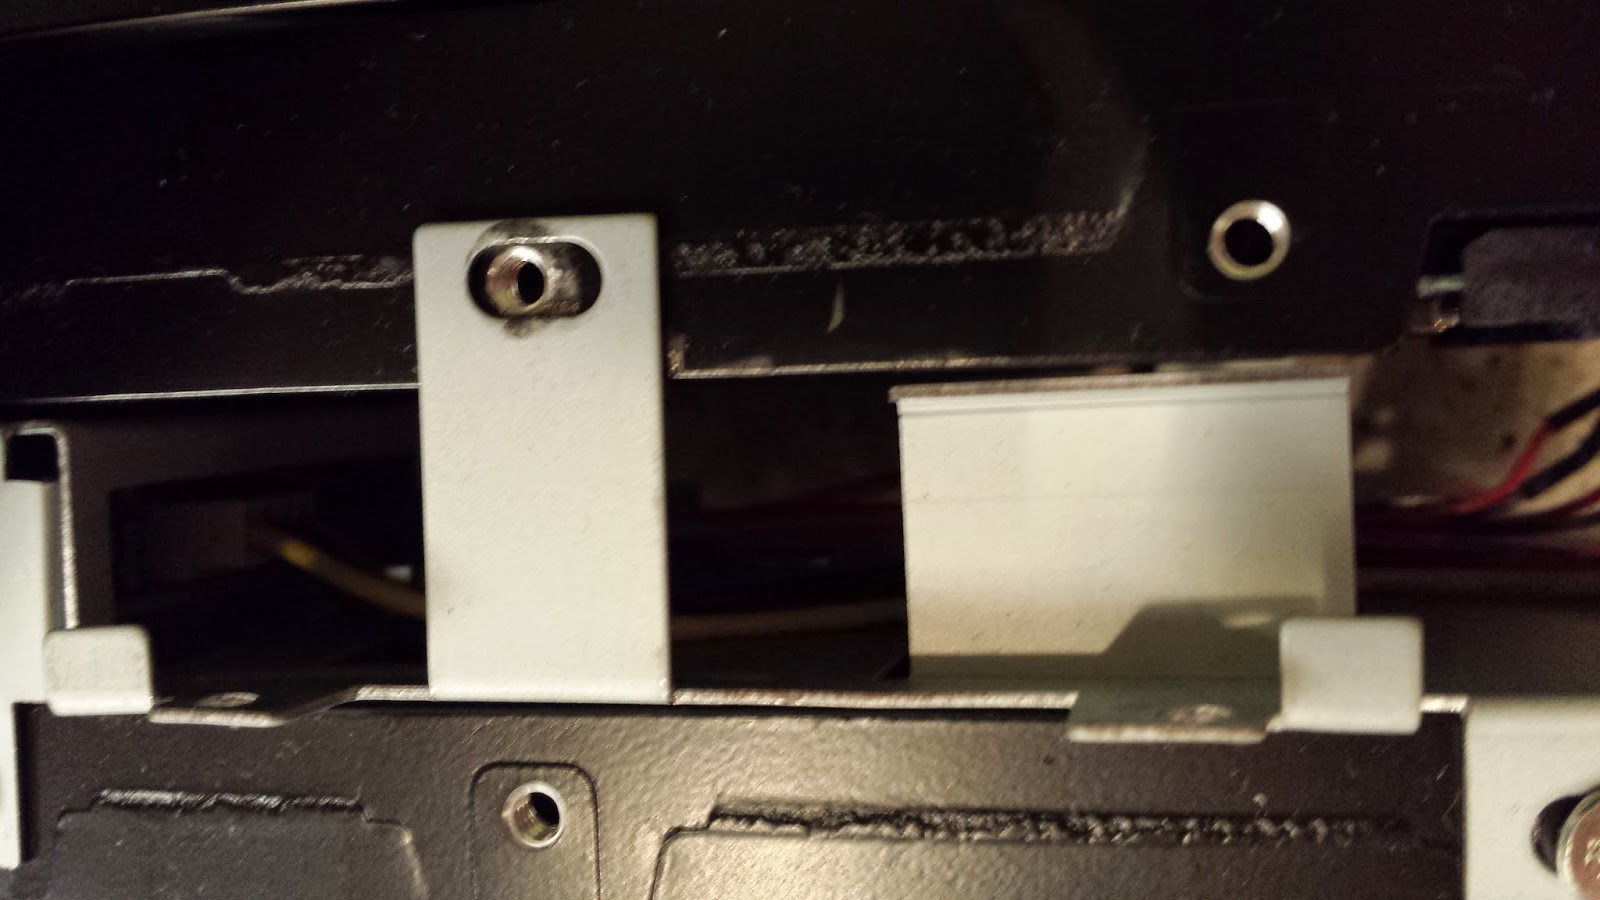
Then, I removed the screws holding the drive assembly in place. The two drives and interface card form one unit.
 |
| Image 7: Close up (actually on re-installation) of the screws to take out to be able to remove the drives from the case. |
DO NOT pry the drive assembly out straight. Lift the part facing the front of the enclosure by tilting it. Then the ports out the back slide out of the holes in the case easily. There is a cable connected to one side of the case. I did not remove the cable because I did not need to get any farther into the case.
 |
| Image 8: Assembly tilted out. |
Here is the drive bracket without the screw in it. I found the screw floating around inside as expected.
 |
| Image 9: bracket from where the screw fell out. |
 |
| Image 10: Final product re-assembled. |
I wrote this up only because I could not find it, and thought that if anyone else wants to do this, they can save themselves from bending the plastic facing the rear of the drive by reading this carefully. I hope it has been clear.
For fun, here is a video of the assembly (taken with my phone). Sometimes I'm busy screwing screws in and the video does not show anything interesting. You can also hear my Shihtzu - Dachshund mix barking at something in the background. More for entertainment.
Youtube link to video
Subscribe to:
Posts (Atom)